
Connecting Limit Switches and the Probe
Connect Normally Closed limit switches and a Probe or Tool Setter to the opto-isolated inputs of the Rabbit Board 4-Axis.
Opto-Isolated Limit and Probe Inputs
The Rabbit Board 4-Axis provides four optocoupler-isolated 12V limit switch inputs and a separate optocoupler-isolated 12V input for a Probe or Tool Setter. Optical isolation helps protect the controller and improves resistance to electrical noise commonly found in CNC installations.
Use only switches, probes, and sensors that are electrically compatible with the Rabbit Board input circuit. Follow the terminal labels and the Rabbit Board wiring diagram. Do not apply an external voltage to an input unless the connection method explicitly requires it.
Disconnect Power Before Wiring
Fully disconnect power from the Rabbit Board and the CNC control box before connecting or disconnecting limit switches, sensors, or the probe. Verify the wiring with a multimeter before applying power.
Route input wiring away from mains voltage, motor cables, spindle wiring, relay contacts, and VFD output cables. Keep the emergency stop accessible during every test involving machine movement.
Use Normally Closed Limit Switches
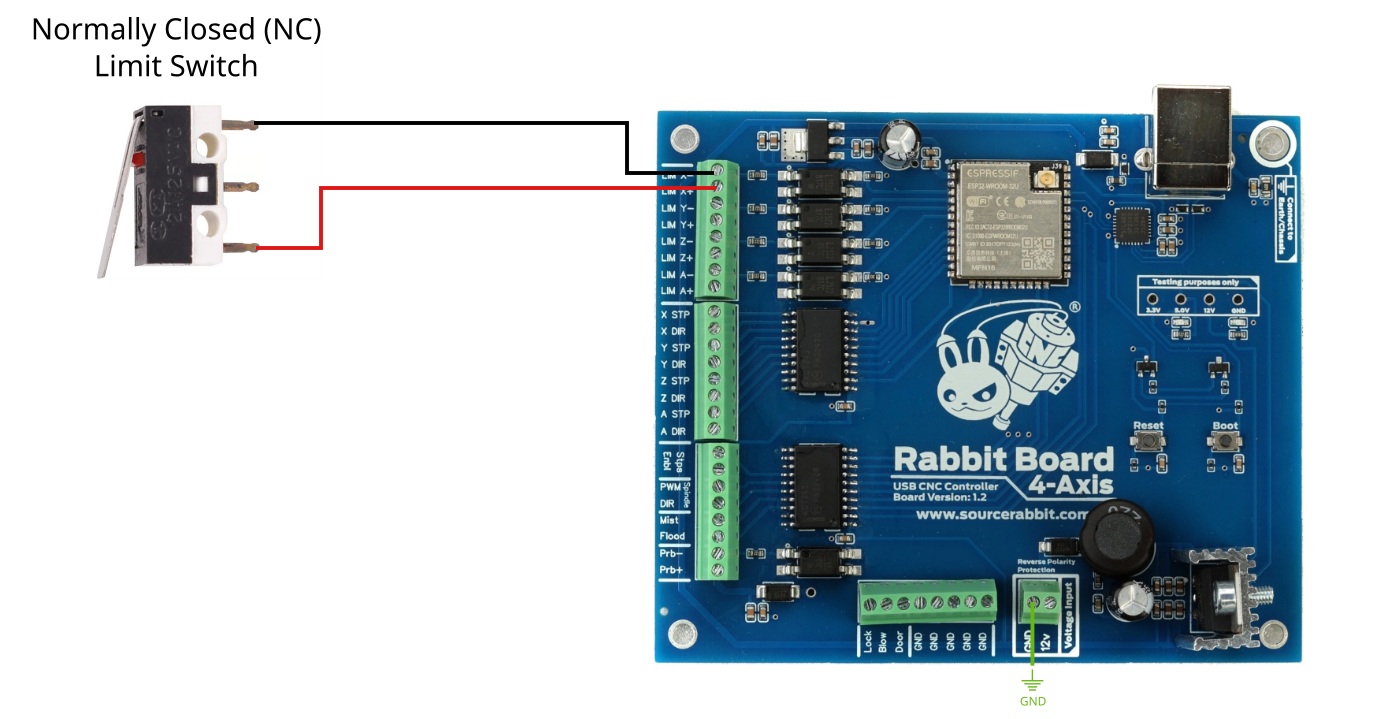
The Rabbit Board 4-Axis is designed to use Normally Closed (NC) limit switches. In the normal, unpressed state, the switch contacts are closed and the input circuit is complete. Pressing the switch opens the circuit.
NC wiring provides safer fault behavior because a broken wire, loose terminal, or disconnected switch also opens the circuit and can be detected as an active limit condition. Connect each axis switch to its corresponding X, Y, Z, or A limit input according to the Rabbit Board wiring diagram.
Connect a Normally Closed Probe or Tool Setter
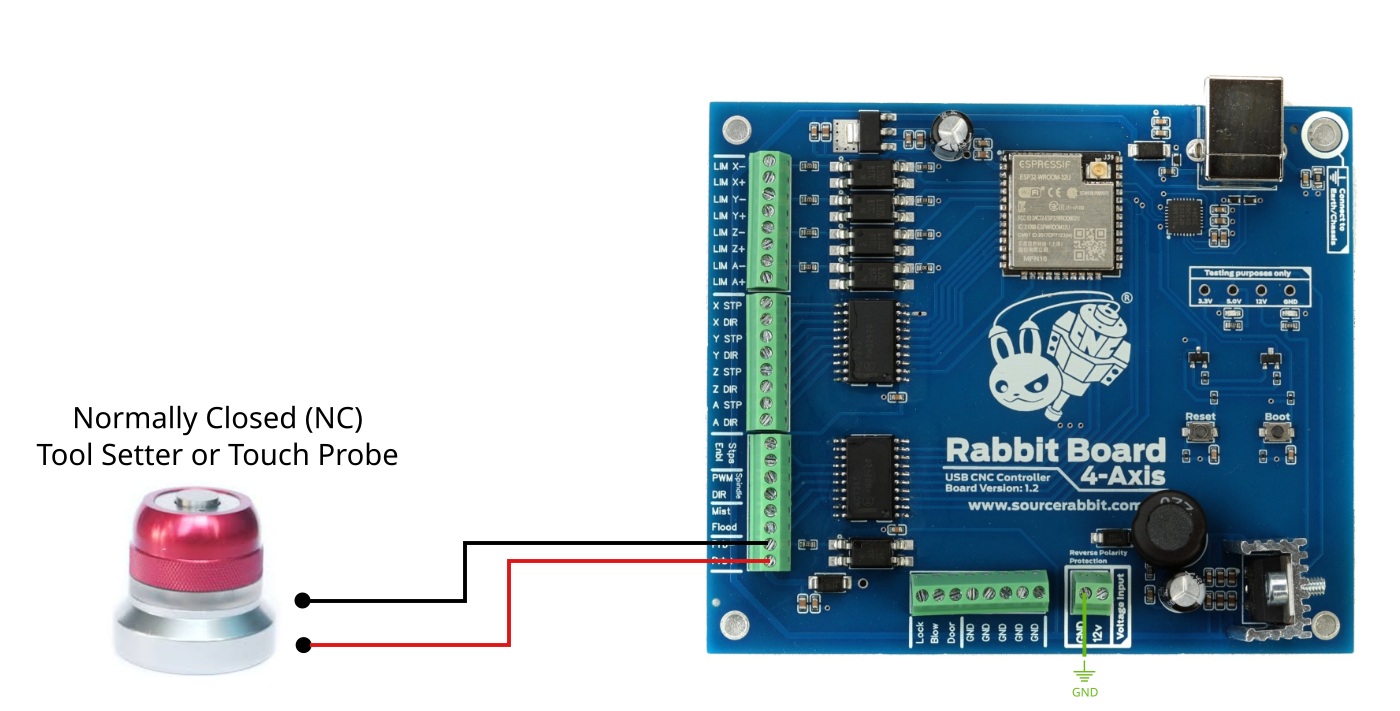
Connect the Probe or Tool Setter to the dedicated probe input. The probe circuit must also operate as Normally Closed (NC): its contacts remain closed when the probe is not triggered and open when contact is detected.
Before running any probing movement, verify the probe operation manually. Use a multimeter to confirm continuity in the normal state and confirm that the circuit opens when the probe or tool setter is triggered. Active electronic probes must have an output compatible with the Rabbit Board 12V opto-isolated input.
Use Noise-Resistant Signal Cables
Use twisted-pair wire for every limit switch and probe circuit. In electrically noisy installations, LIYCY-type or another suitable shielded signal cable is recommended. Route these cables separately from motor, spindle, VFD, relay, and mains wiring.
Follow the system grounding design when terminating cable shields. If coolant, water, or other liquids are present, use waterproof limit switches with an appropriate ingress protection rating, such as IP67, and protect all cable joints from moisture.
Check the Rabbit GRBL Input Settings
Rabbit GRBL uses $5 for limit input inversion and $6 for probe input inversion. The firmware profile supplied for the Rabbit Board should already contain the correct defaults for the board wiring. Change these settings only when you understand the required electrical state and have confirmed the wiring.
Hard limits are controlled by $21, while the homing cycle is controlled by $22. Do not enable hard limits or begin homing until every switch reports the correct state and the machine can move safely away from each switch.
Test Every Input Before Machine Movement
Power the controller without starting a machining job. Check each limit input individually by operating its switch by hand and confirming that the controller reports the state change. Also test the fail-safe behavior by disconnecting one switch wire and confirming that the input changes to the limit-active state.
Test the probe manually before issuing a probing command. When the electrical state is confirmed, perform the first probing movement over a short distance and at a low feed rate, with enough clearance to stop the machine safely. Never place your hands between the probe, tool, workpiece, or moving machine parts during a probing cycle.