
Facing
Generate ZigZag Facing passes automatically across the top of the project Stock. Configure stepover, cutting angle, Safe Level, and feeds and speeds.
Facing Overview
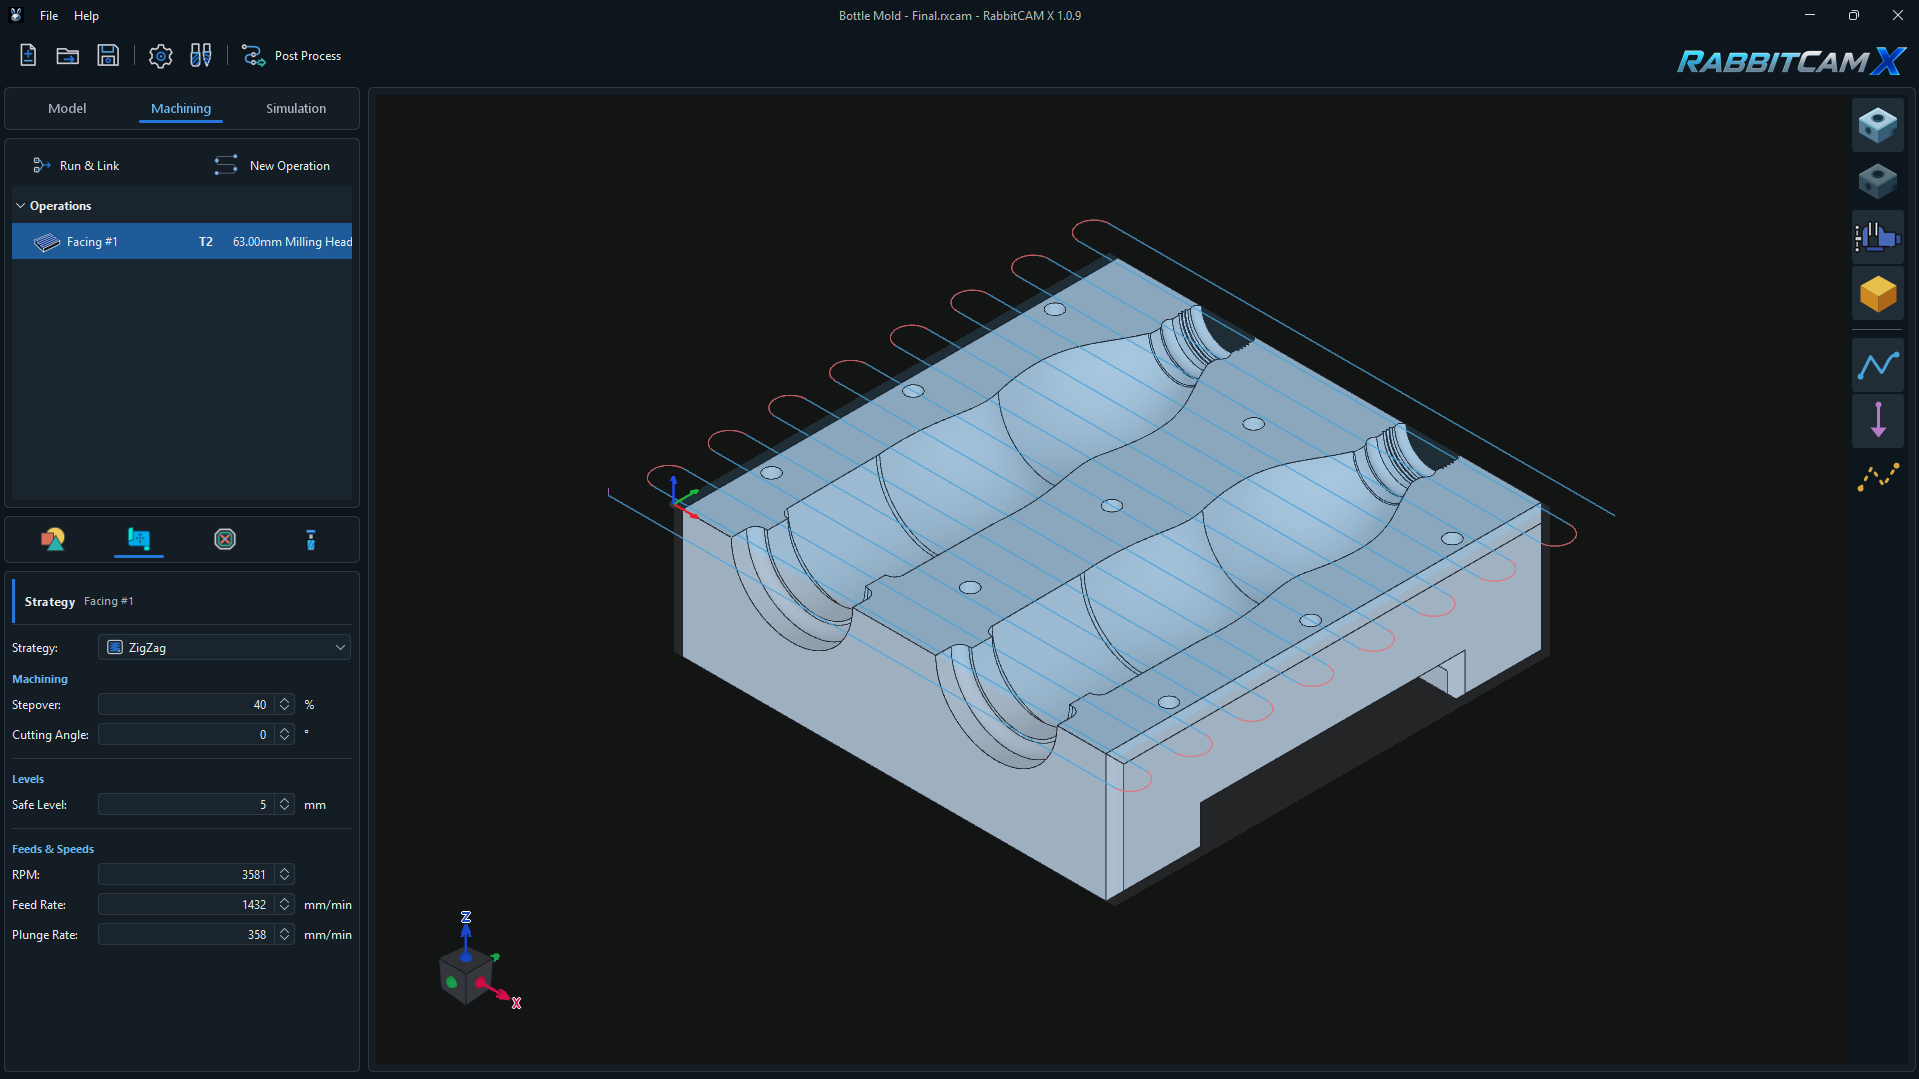
Facing creates parallel cutting passes across the top of the Stock. It uses the ZigZag strategy, with successive passes running in opposite directions.
The operation automatically uses the Stock's X/Y bounds for coverage and its highest Z for the cutting plane. You do not need to select a part surface or enter a cutting height.
The example above shows Facing #1 using T2 — 63.00 mm Milling Head. The Strategy panel contains the machining, clearance, and feed settings described below.
Creating a Facing Operation
- Prepare the Part, Stock, and Workpiece Coordinate System in the Model tab.
- Open Machining and click New Operation.
- Under 2D / 2.5D Operations, select Facing.
- Keep the suggested name or enter a descriptive name for the operation.
- Review the assigned tool. Use the ... button beside the tool field to select a compatible milling tool when needed.
- Click Create, select the new operation in the Operations tree, and open Strategy.
Facing determines both its coverage and cutting height from the Stock, so you do not need to pick part surfaces or boundaries for the Job Assignment. Confirm the Stock dimensions and position, including the height of its top surface.
Automatic Cutting Plane at the Stock Top
Facing generates its passes at a single height: the highest Z of the Stock defined in the project. The Strategy panel has no Top Level, Bottom Level, or Depth per Pass field.
RabbitCAM X converts that height into work coordinates using:
Facing Z = Stock top Z in model coordinates − Work Zero Z in model coordinates
For example, if the Stock top is at model Z20 mm and Work Zero is at model Z15 mm, Facing runs at work Z+5 mm. If Work Zero is on the Stock top, the cutting plane is work Z0. If Work Zero is above the Stock top, the cutting Z is negative.
Moving Work Zero changes the reported work-coordinate Z of the cutting plane; the physical plane remains at the Stock top. Moving or resizing the Stock can change that physical height. Recalculate the toolpath after either change.
The operation uses the project Stock's defined bounds, independently of material removed by earlier operations. It does not derive a new top surface from the remaining stock.
The passes run exactly at the defined Stock top. Facing does not add a lower cutting offset or divide material removal into multiple depth passes.
For coordinate setup, see Setting the Workpiece Coordinate System.
Configuring the ZigZag Strategy
The Strategy selector displays ZigZag. Configure its passes using the following fields:
- Stepover — the spacing between adjacent passes, expressed as a percentage of tool diameter. The available range is 1–100%. A smaller value places the passes closer together. In the screenshot, a 63 mm tool at 40% stepover gives a nominal spacing of 25.2 mm.
- Cutting Angle — the direction of the passes in the X/Y plane. At 0°, the passes run parallel to X; at 90°, they run parallel to Y. Change the angle to suit the stock orientation and available approach space.
- Safe Level — the clearance Z coordinate relative to Work Zero. It must be above the Stock top in work coordinates. The screenshot uses Z+5 mm; this is a Z position, not a distance automatically added above the Stock. For a Facing plane at Z+5 mm, a Safe Level of Z+10 mm provides 5 mm of vertical clearance.
The tool-center boundary uses the Stock's X/Y bounds and extends outward by the tool radius so the cutter can pass fully across the edges. These extensions are expected; inspect the surrounding space and any work holding when checking the generated path.
Setting Feeds and Speeds
The Feeds & Speeds section controls spindle speed and feed movements:
- RPM — spindle speed in revolutions per minute. The screenshot shows 3581 RPM.
- Feed Rate — the cutting feed along the ZigZag passes, in mm/min. The example uses 1432 mm/min.
- Plunge Rate — the feed used to enter the cutting plane at the Stock top, in mm/min. The example uses 358 mm/min.
These values illustrate the pictured project. Choose the operating values for your actual cutter, material, machine, and amount of material being removed.
Facing Around Work Holding
Facing checks the enabled Work Holding physical obstacles at the Stock-top cutting height. It excludes the corresponding tool-center areas, accounting for the cutter radius and configured safety clearance, when generating its passes.
The generated clearance height can be raised above the entered Safe Level when needed to clear the modeled work holding. Check the resulting approach, linking, and retract movements in the 3D view and Simulation.
If the fixtures exclude the entire facing area, generation reports an error. Review their placement and the available cutting space. Hiding a fixture with Render Work Holding only changes its visibility; it remains an obstacle.
For fixture setup, see Setting Up Work Holding.
Generating and Checking the Toolpath
- Click Run & Link to calculate the toolpaths.
- Select the Facing operation and inspect the coverage, pass direction, and paths extending beyond the Stock. Confirm that the cutting passes lie at the Stock top.
- Open Simulation and review the material removal, entry moves, links between passes, and final retract.
- If you change the tool, stock, work zero, work holding, or strategy settings, run the calculation again.
- Save the project with Ctrl+S. When the setup is complete, use Post Process to generate the machining program.
If Facing does not generate, confirm that the project has a Stock and Work Zero, the operation has a compatible tool with a positive diameter, the stepover is valid, and Safe Level is above the Stock top in work coordinates. An entered Safe Level at or below the cutting plane is rejected.
If the path is at an unexpected height, review the Stock dimensions and position together with the WCS Z origin. The cutting plane always follows the defined Stock top; shifting Work Zero does not create a deeper facing cut.